Why review engineering drawings?
As a design or manufacturing engineer you will make mistakes, and that’s OK! The best engineering teams recognize this and put in place review processes to catch preventable mistakes before drawings are released. If you’ve ever manufactured a part with an incorrect specification you know how painful small drawing mistakes can be. In this short primer, we’ll be outlining best practices for reviewing engineering drawings that you can implement quickly and easily on your projects.
Start with a solid understanding of design and manufacturing
Before we examine the drawing review process, it’s important to understand a few key elements about engineering drawings and 2D communication. Without this understanding, your drawings are more likely to include critical mistakes.
-
Design manufacturable parts: No amount of attention to detail on an engineering drawing can make an un-manufacturable part easier to manufacture. Simplicity and manufacturability at the part level result in simplicity and clarity at the drawing level. If the drawing is overly complicated or difficult to understand, it may indicate a problem with the design that needs to be addressed.
-
Convey design intent: Engineering drawings should clearly communicate the design intent of the part. Dimensions, notes, and annotations should reflect this intent in as direct a manner as possible. Always remember that the person you are handing off the drawing to most likely has very little information about the part usage outside of what is on the drawing. Drawings are often your only opportunity to communicate this design intent.
-
Inspectability: The dimensions on the drawing should facilitate inspection of the part. Clear dimensions between functional interfaces make inspection easier and reduce the likelihood of functional failures. This goes hand in hand with design intent communication.
-
Communicate the hierarchy of feature importance when dimensioning: Important mating surfaces and critical interfaces should be identified in the drawing. Dimensions should be set up between these important surfaces to guide the manufacturing process. Less important surfaces can be excluded from the chain of dimensions, allowing relaxed tolerances in non-functional areas.
-
Clarity: Here are a few quick tips for making clear and legible drawings.
-
Don’t cross dimension lines.
-
Don’t dimension hidden lines.

-
Use ordinate dimensions when possible.

-
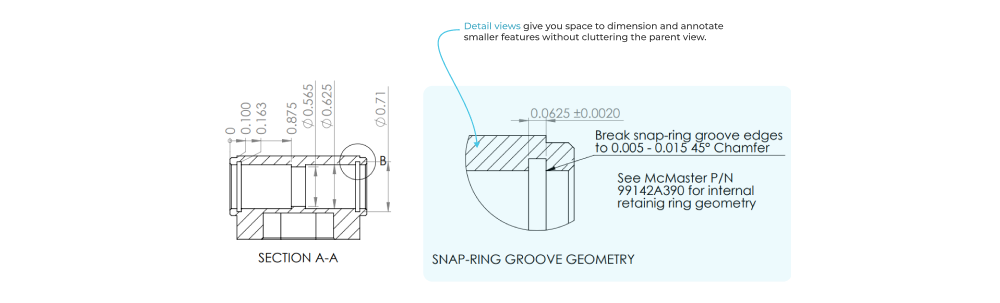
Use as many section views, detail views, and pages as necessary, but nothing more.
-
Write simple and direct notes to clarify any ambiguity in the drawing or add extra information to convey design intent. (drill bit size, form tap hole, ream to fit, etc..).

-
Add appropriately scaled projected, section, and detail views using all of the drawing space you have.
-
Include an un-dimensioned isometric view to communicate 3D geometry at a glance.
-
For a deep dive into engineering drawings with practical examples, check out our Ultimate Guide to Engineering Drawings.
-
These tips will help you create drawings that effectively communicate the design intent and facilitate the manufacturing and inspection processes.
Invest in shared infrastructure for making great drawings
Your engineering drawings shouldn’t start with a blank page. Here are some key pieces of engineering drawing infrastructure that you can create to help your team be more efficient, include complete information, and prevent repeated mistakes.
-
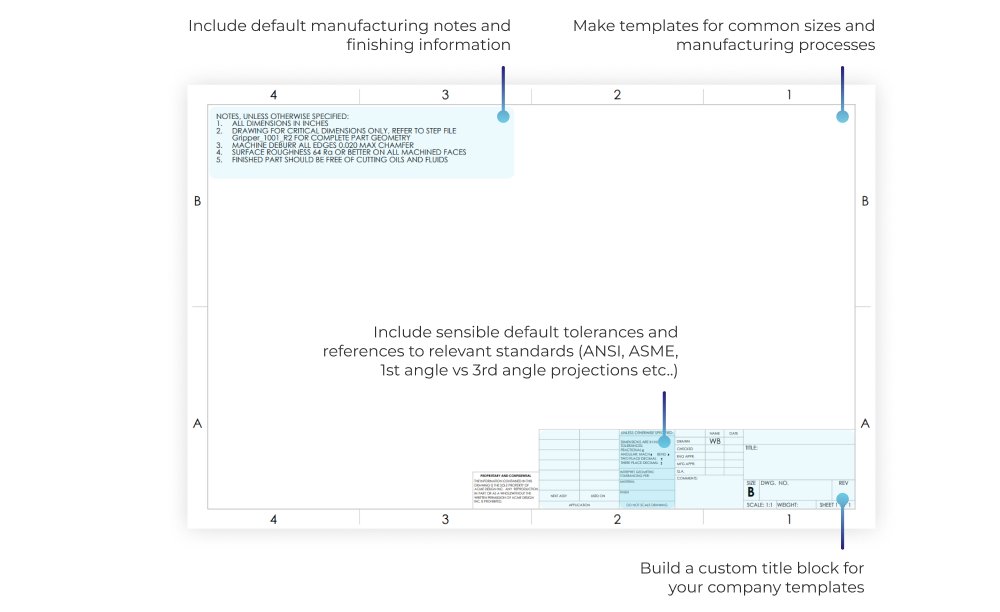
Templates: Set up drawing sheet templates in your CAD software with appropriate default tolerances, references to standards, and alphanumeric grid lines. Consider creating templates for different manufacturing processes to include process-specific drawing notes.
-
Manufacturing notes: Different manufacturing processes impact part functionality and design intent. It is recommended to have standard drawing notes for each process. If not included in templates, maintain a central location where engineers can easily access and copy the latest drawing notes.
-
Default tolerances: If the first time you think about tolerances is when you are making a drawing, you’re doing it wrong. You should go into the drawing creation process with a pretty clear idea of what tolerances are necessary to preserve and communicate design intent. Accordingly, you should choose conservative default tolerances in title blocks based on the types of parts you design. If you need guidance on tolerances, check out our CNC tolerance article or pick up a machinery’s handbook. If you want help calculating tolerances at the assembly level, give our tolerance analysis calculator a try.
-
Checklists: Create a checklist of common items to include or consider for each drawing. This helps prevent mistakes of omission and ensures thorough output. Checklists are essential for achieving repeatable results when the drawing workload is high. Check out the Five Flute drawing review checklist for more info. We have free PDF, google sheets, and notion templates to get you started building your own review checklist.
Define your engineering drawing review goals
Drawing reviews vary in fidelity, project stage, and purpose. It is crucial to clarify the review's goal and align it with the current development stage.
- For simple critical to function drawings made during a prototyping phase, a basic drawing legibility check will suffice. Reviewers will be looking to ensure the overall drawing architecture makes sense (views, scale, etc), that there is dimensional completeness and legibility, and that enough information is conveyed to manufacturers to make a few prototypes.
- Parts with higher quantities or precision benefit from a focused design for manufacturability (DFM) review, prioritizing the specific part without extensive consideration of its relation to other components.
- Sometimes a drawing review is included in a larger design review process (ie: critical design review, or production readiness review). In this case, the drawing review burden can be significantly higher. Not only is drawing completeness and DFM a concern, but the design intent of the component as it relates to other parts and assemblies must also be considered. This introduces dependencies between parts in the form of tolerance stack-ups that require significant engineering time to address.
The bottom line is that reviewers need to know the scope of the review so that they can provide relevant and helpful feedback. This keeps reviewers from wasting time going too deep, or missing preventable mistakes by not going deep enough.
Select your drawing reviewers carefully
Because drawing reviews can happen at varying levels of design maturity and scope, be sure you give some thought to who you want involved in your review and why. Here are some key points to keep in mind when selecting reviewers.
- Consider the reviewers' expertise in design for manufacturability (DFM) and process-specific knowledge.
- Including individuals unfamiliar with the parts can bring fresh perspectives and catch overlooked mistakes. Ignorance or unfamiliarity with a design can catch mistakes that more embedded designers are team members might be blind to.
- Invite representatives from the internal manufacturing team to address interpretation and DFM concerns.
- Distribute the workload among multiple reviewers to ensure higher quality output and reduce tedium.
How to execute an effective drawing review
The purpose of your review is to meet your review goals. Typically this means you are trying to find drawing and design errors, discussing corrective actions, and creating corrected output (ie: a new drawing). Here’s a few pro tips on feedback and collaboration for reviewers and drawing creators alike.
Find your focus as a reviewer
Lets be honest, drawing reviews can be boring! Set yourself up for success as a reviewer. For me this means doing my reviews early in the day when my focus (and caffeine!) is high. Find a place that is free from distraction, or get a great pair of noise canceling headphones and pick some music that gets you into flow state.
Use the review checklist!
Don’t just absent-mindedly scan the drawing for “mistakes,” instead use your check list! It helps to think hierarchically here as well, working from low fidelity to high fidelity (ie: first check that there are appropriate views, scaling, and process information, before diving deep into feature specific concerns like GD&T or process specific DFM issues). Here are some key items to include in your review checklist.
- Drawing preparation, title block and sheet structure. Look for basic part and personnel information as well as guidance on drawing interpretation and standards.
- Views and geometry. Look for completeness of drawing views and basic geometric communication.
- Dimensions and tolerances. Check for completeness and accuracy of critical dimensions and tolerances with an eye towards inspection.
- Notes, annotations and revisions. Check to make sure design intent is conveyed properly and thoroughly with additional drawing annotations, functional manufacturing notes, and a double check of part and drawing revisions to keep you in sync with your manufacturer about the latest version.
- Functional Interfaces. Be sure the part works well within an assembly by checking functional interfaces and their associated tolerances and feature interactions.
- Design for manufacturability. Interrogate the drawing from the perspective of the manufacturing process.
Provide feedback in context
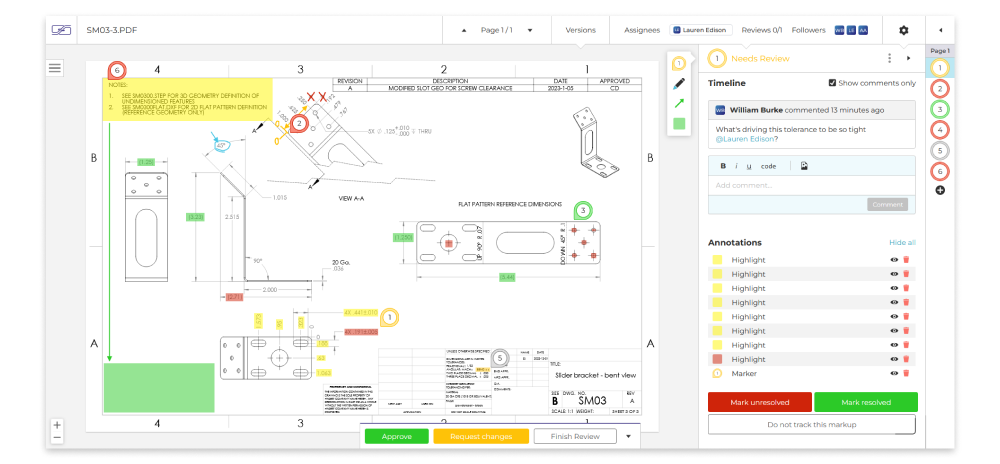
The number one way to speed up drawing related communication is to directly mark up the drawings themselves. This ensures a shared context between reviewers and the engineer or drafter that created the drawing. You can do this with a pen and highlighter plus printed drawings, basic comments in Adobe Acrobat, or try Five Flute.
Put yourself in the mind of the manufacturer
Once you’ve gone through the checklist, put yourself in the shoes of the manufacturer who will receive the drawing. Is there enough information to make the part? What process is needed to make it? What size stock material is needed to make it? What are the important features? What orientation and manufacturing strategy will you use? Are all features defined fully? What CAD file is associated with the drawing?
Close the loop: address all markups and approve (or reject)
This part is obvious but rarely done well. Once you collect feedback on a set of drawings you need to fix them.
-
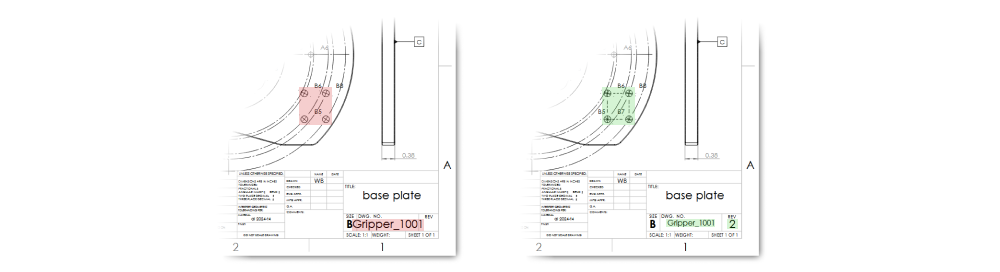
Iterate and compare revisions. Inherently this leads to an updated version of the drawing that often carries the exact same part revision (and filename!). As a reviewer, once a new version of the drawing is made you want to compare markups on the old drawing with the newly corrected drawing to ensure that all the feedback was addressed.
-
Be rigorous. You want to close the loop on all issues to ensure your final drawing output is accurate. Unfortunately, there is no avoiding a certain level of rigor at this stage to just ensure everything has been addressed in your list. If you don’t address all feedback point-by-point, you risk making a simple mistake that costs thousands of dollars and weeks of schedule setbacks.
-
How it works in Five Flute. Five Flute is built with version management in mind. As an engineer responsible for a set of drawings its easy to drag and drop in new versions of any drawing that is actively being reviewed. All existing markup shows on both drawings and there is a built in toggle button so you can easily spot the differences between previous and current drawing versions. This makes markup resolution a breeze.
Final thoughts
Effective drawing reviews are vital for catching preventable mistakes and ensuring successful outcomes in design and manufacturing. Understanding design and manufacturing principles, utilizing shared infrastructure like templates and checklists, and carefully selecting reviewers with relevant expertise are key steps. To execute an efficient review make sure you find a time and place that allows you to focus, use a checklist, provide feedback on the drawings themselves, and consider the perspective of the manufacturer. Close the loop by addressing all markups point by point and approving revised drawings. By following these guidelines, teams can improve their drawing review processes, save money, and keep projects on track.
If you want a simple way to follow these best practices and catch preventable drawing mistakes, check out Five Flute today. Here’s a demo video showing how typical review process works. Thanks!
You might also enjoy
For an even deeper dive into drawing reviews, check out our Ultimate Guide Drawing Reviews.

It expands on this article with real world examples, concrete practices you can implement with your team, and much more.